Cat Face Paint Designs

0

Cat Face Paint Designs

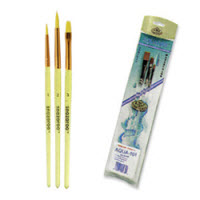
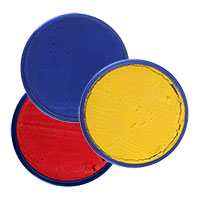
This Cat Face Paint Kit comes with Snazaroo face paint, face paint brushes, and glitter and FacePaint’s Exclusive step by step instructions and instructional video which you can see online below.

Step-by-Step Instructions:

General Tips: Apply the lighter face paint colors before starting on the darker colors.

How to Use a Face Paint Brush: To load face paint on the brush: dip the brush into a bowl of water and mix it into the face paint to pick up the face paint. Apply the face paint brush in smooth even strokes.

How to Use a Face Paint Sponge: To load face paint onto the sponge: add water to the face paint sponge and dip into the face paint. Make sure that the face paint has a creamy consistency. Remember to try to use the minimum amount of water. First smear the face paint on then dab the face paint with the sponge to get an even opaque coverage.

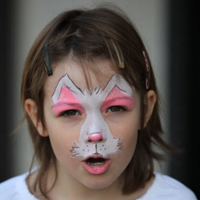
Step 1: Using a medium brush, put a white face paint outline for cat ears on the forehead and continue with white face paint down the nose and upper lip; leave space over eyebrows. Make little whisker shapes above the mouth.

Step 2: Rinse a medium brush, and use it to apply pink face paint in a triangle on the end of nose.Use the same color and fill inside of cat ears, over the eyelids and over the eyes.

Step 3: Use black face paint and a fine brush to outline the whiskers. Add a line down from the bottom of the nose to the mouth, and add three dots on either side. Outline around the ears in black face paint.

Step 4: Using a small brush, highlight around the pink eyes with white face paint. Use white sparkles on the ear area and the nose.

To Remove Face Paint: Remove the face paint with mild soap and water with a washcloth, baby wipe or paper towel. Remember to keep the face paint out of the eyes.

To Store Your Face Paint: Store the face paint with the lid closed. The face paint should last 18 months after 1st opening.

Butterfly Face Paint Designs

0

Butterfly Face Paint Designs

This Butterfly Face Paint Kit comes with Snazaroo face paint, face paint brushes, and glitter and FacePaint’s Exclusive step by step instructions and instructional video which you can see online below.

Step-by-Step Instructions:

General Tips: Apply the lighter face paint colors before starting on the darker colors.

How to Use a Face Paint Brush: To load face paint on the brush: dip the brush into a bowl of water and mix it into the face paint to pick up the face paint. Apply the face paint brush in smooth even strokes.

How to Use a Face Paint Sponge: To load face paint onto the sponge: add water to the face paint sponge and dip into the face paint. Make sure that the face paint has a creamy consistency. Remember to try to use the minimum amount of water. First smear the face paint on then dab the face paint with the sponge to get an even opaque coverage.

Step 1: To create butterfly face painting designs, start with a medium brush and outline above and below the eyes with light blue face paint. You are making a butterfly shape. Leave space immediately around the eyes.

Step 2: Over the light blue face paint, add lilac face paint over the eyebrows and cheeks with a medium brush.

Step 3: Using a fine brush and black face paint, outline the nose to make the body of the butterfly. Again, with a fine brush and black face paint add antenna and swirls around the eyes.

Step 4: Using a small brush add dots with black face paint and white face paint. Put white face paint on the eyelids and create eyelash effect with a medium brush.

Step 5: Add white face paint as lip color and white and blue glitter for a finishing touch

To Remove Face Paint: Remove the face paint with mild soap and water with a washcloth, baby wipe or paper towel. Remember to keep the face paint out of the eyes.

To Store Your Face Paint: Store the face paint with the lid closed. The face paint should last 18 months after 1st opening.

Blue Man Face Paint Designs

0

Blue Man Face Paint Designs

This Blue Man Face Paint Kit comes with Snazaroo face paint, face paint brushes, and glitter and FacePaint’s Exclusive step by step instructions and instructional video which you can see online below.

Step-by-Step Instructions:

General Tips: Apply the lighter face paint colors before starting on the darker colors.

How to Use a Face Paint Brush: To load face paint on the brush: dip the brush into a bowl of water and mix it into the face paint to pick up the face paint. Apply the face paint brush in smooth even strokes.

How to Use a Face Paint Sponge: To load face paint onto the sponge: add water to the face paint sponge and dip into the face paint. Make sure that the face paint has a creamy consistency. Remember to try to use the minimum amount of water. First smear the face paint on then dab the face paint with the sponge to get an even opaque coverage.

Step 1: Use a medium brush to outline face with blue face paint.

Step 2: Fill in the face with blue face paint with a sponge. Leave area above the eyes empty.

Step 3: Using a medium brush and yellow face paint, add yellow above the eyes and over the eyelids.

To Remove Face Paint: Remove the face paint with mild soap and water with a washcloth, baby wipe or paper towel. Remember to keep the face paint out of the eyes.

To Store Your Face Paint: Store the face paint with the lid closed. The face paint should last 18 months after 1st opening.

Zombie Face Paint Designs

0

Zombie Face Paint Designs

This Zombie Face Paint Kit comes with Snazaroo face paint, face paint brushes, and glitter and FacePaint’s Exclusive step by step instructions and instructional video which you can see online below.

Step-by-Step Instructions:

General Tips: Apply the lighter face paint colors before starting on the darker colors.

How to Use a Face Paint Brush: To load face paint on the brush: dip the brush into a bowl of water and mix it into the face paint to pick up the face paint. Apply the face paint brush in smooth even strokes.

How to Use a Face Paint Sponge: To load face paint onto the sponge: add water to the face paint sponge and dip into the face paint. Make sure that the face paint has a creamy consistency. Remember to try to use the minimum amount of water. First smear the face paint on then dab the face paint with the sponge to get an even opaque coverage.

Step 1: Use a sponge and coat the face with white face paint. Then fill in the outline using more white. Put on lightly.

Step 2: Put on yellow face paint lightly with a sponge, blending in without making it too bright. Coverage doesn’t have to be perfect right now; effects come later.

Step 3: Use grey face paint around the eyes with a medium brush. Add a little bit of black, also with a medium brush, to shade the eyes. Blend it in a little bit. Use white face paint and a medium brush to make teeth around the mouth. Add red face paint to paint the side of the mouth with a medium brush.

Step 4: Take a small brush and black face paint and make lines around the mouth and outline the teeth. Now, make cracks all over the face with black and a small brush. Use white face paint with a small brush to highlight the cracks. Brush lightly with a medium brush and white and then add a little bit of black for the eyes.

Step 5: Use stage blood on the cracks and the cheeks with a small brush. Make drips to make it scary.

To Remove Face Paint: Remove the face paint with mild soap and water with a washcloth, baby wipe or paper towel. Remember to keep the face paint out of the eyes.

To Store Your Face Paint: Store the face paint with the lid closed. The face paint should last 18 months after 1st opening.

Vampire Face Paint Designs

0


Vampire Face Paint Designs
This Vampire Face Paint Kit comes with Snazaroo face paint, face paint brushes, and glitter and FacePaint’s Exclusive step by step instructions and instructional video which you can see online below.

Step-by-Step Instructions:

General Tips: Apply the lighter face paint colors before starting on the darker colors.

How to Use a Face Paint Brush: To load face paint on the brush: dip the brush into a bowl of water and mix it into the face paint to pick up the face paint. Apply the face paint brush in smooth even strokes.

How to Use a Face Paint Sponge: To load face paint onto the sponge: add water to the face paint sponge and dip into the face paint. Make sure that the face paint has a creamy consistency. Remember to try to use the minimum amount of water. First smear the face paint on then dab the face paint with the sponge to get an even opaque coverage.

Step 1: Use sponge to put on white face paint base.

Step 2: Use a medium brush to put purple face paint on the eyelids and above the eyes.

Step 3: Use a medium and small brush and use black face paint to make the eyebrows bushier.

Step 4: Add red face paint with a medium brush to the lips and add stage blood with a medium brush on the outside of the lips to create the effect of dripping blood.

Step 5: Use a white face paint and small brush to add fangs on the lips and outline with black face paint.

To Remove Face Paint: Remove the face paint with mild soap and water with a washcloth, baby wipe or paper towel. Remember to keep the face paint out of the eyes.

To Store Your Face Paint: Store the face paint with the lid closed. The face paint should last 18 months after 1st opening.

Halloween Face Makeup

0

Halloween Face Makeup


Halloween Face Makeup


Looking for makeup for Halloween? Our adult Halloween makeup kits are made with only the highest-quality non water-based face paint. You’ll find everything you need for our easy step by step face painting designs in our adult Halloween make up face painting kits. Our Halloween costume makeup contain products that apply easily and effortlessly. Unique looks and character can be achieved with our Halloween makeup kits.

For more information about face paint visit: Facepaint.com

Temporary Tattoos

0

Temporary Tattoos

These assorted temporary tattoo kits for kids are a fun and easy (and removable) form of body art. This kid temporary tattoo set includes flowers, guitars, aliens, fish, hearts, butterflies, and snakes, but assortments may vary. Detailed directions come with these temporary tattoo kits and are extremely easy to follow. These are a perfect addition to your next face paint party.

For more information about face paint visit: Facepaint.com

Basic Face Painting Brushes

0

Basic Face Painting Brushes

Which face painting brush should you use? There are so many choices and depending on which brush you use, the results can tricky so here are a couple of brushes we recommend for getting started. From round brushes, the most used face painting because they can lay down a base and add details to flat brushes which are used for split cakes, making petals, making broad strokes and more. The basics are here.

For more information about face paint visit: Facepaint.com

Basic Face Paints

0

Basic Face Paints

Using face paint opens up a whole world for a painter. Easy to apply and easily to remove with just soap and water face paint can be used for parties, events, teams, fans or anyone who wants to add a colorful design to any part of the body. Basic face paints are cakes which need just a dab of water to activate them.

Face Painting For Beginners

0

Face Painting For Beginners

Face Painting For Beginners

Are you a new face painter asking, “What do I need to start face painting?” The basic things you need are some paint, applicators (brushes & sponges), clean water and a willing face to paint. Its usually easiest to start with a face paint kit, which will include several colors in smaller sizes, allowing you to learn to paint without breaking the budget. Many of our kits include a book of basic face paint designs, brushes and a sponge, and these accessories are also available separately. We even have kits that include just a few colors and teach you how to make a single face, making them ideal for theme parties!